Hesine M-505/Anet A8 Upgrade Part 2: Bowden Titan Extruder

Welcome to the second part of the Hesine M-505 Upgrade guide. If you followed the first part you should have something extremely like a Anet A8 just more unlikely to become Spencer Storm (aka Human torch).

The guide applies to both printers, you just have to print the right mount part.
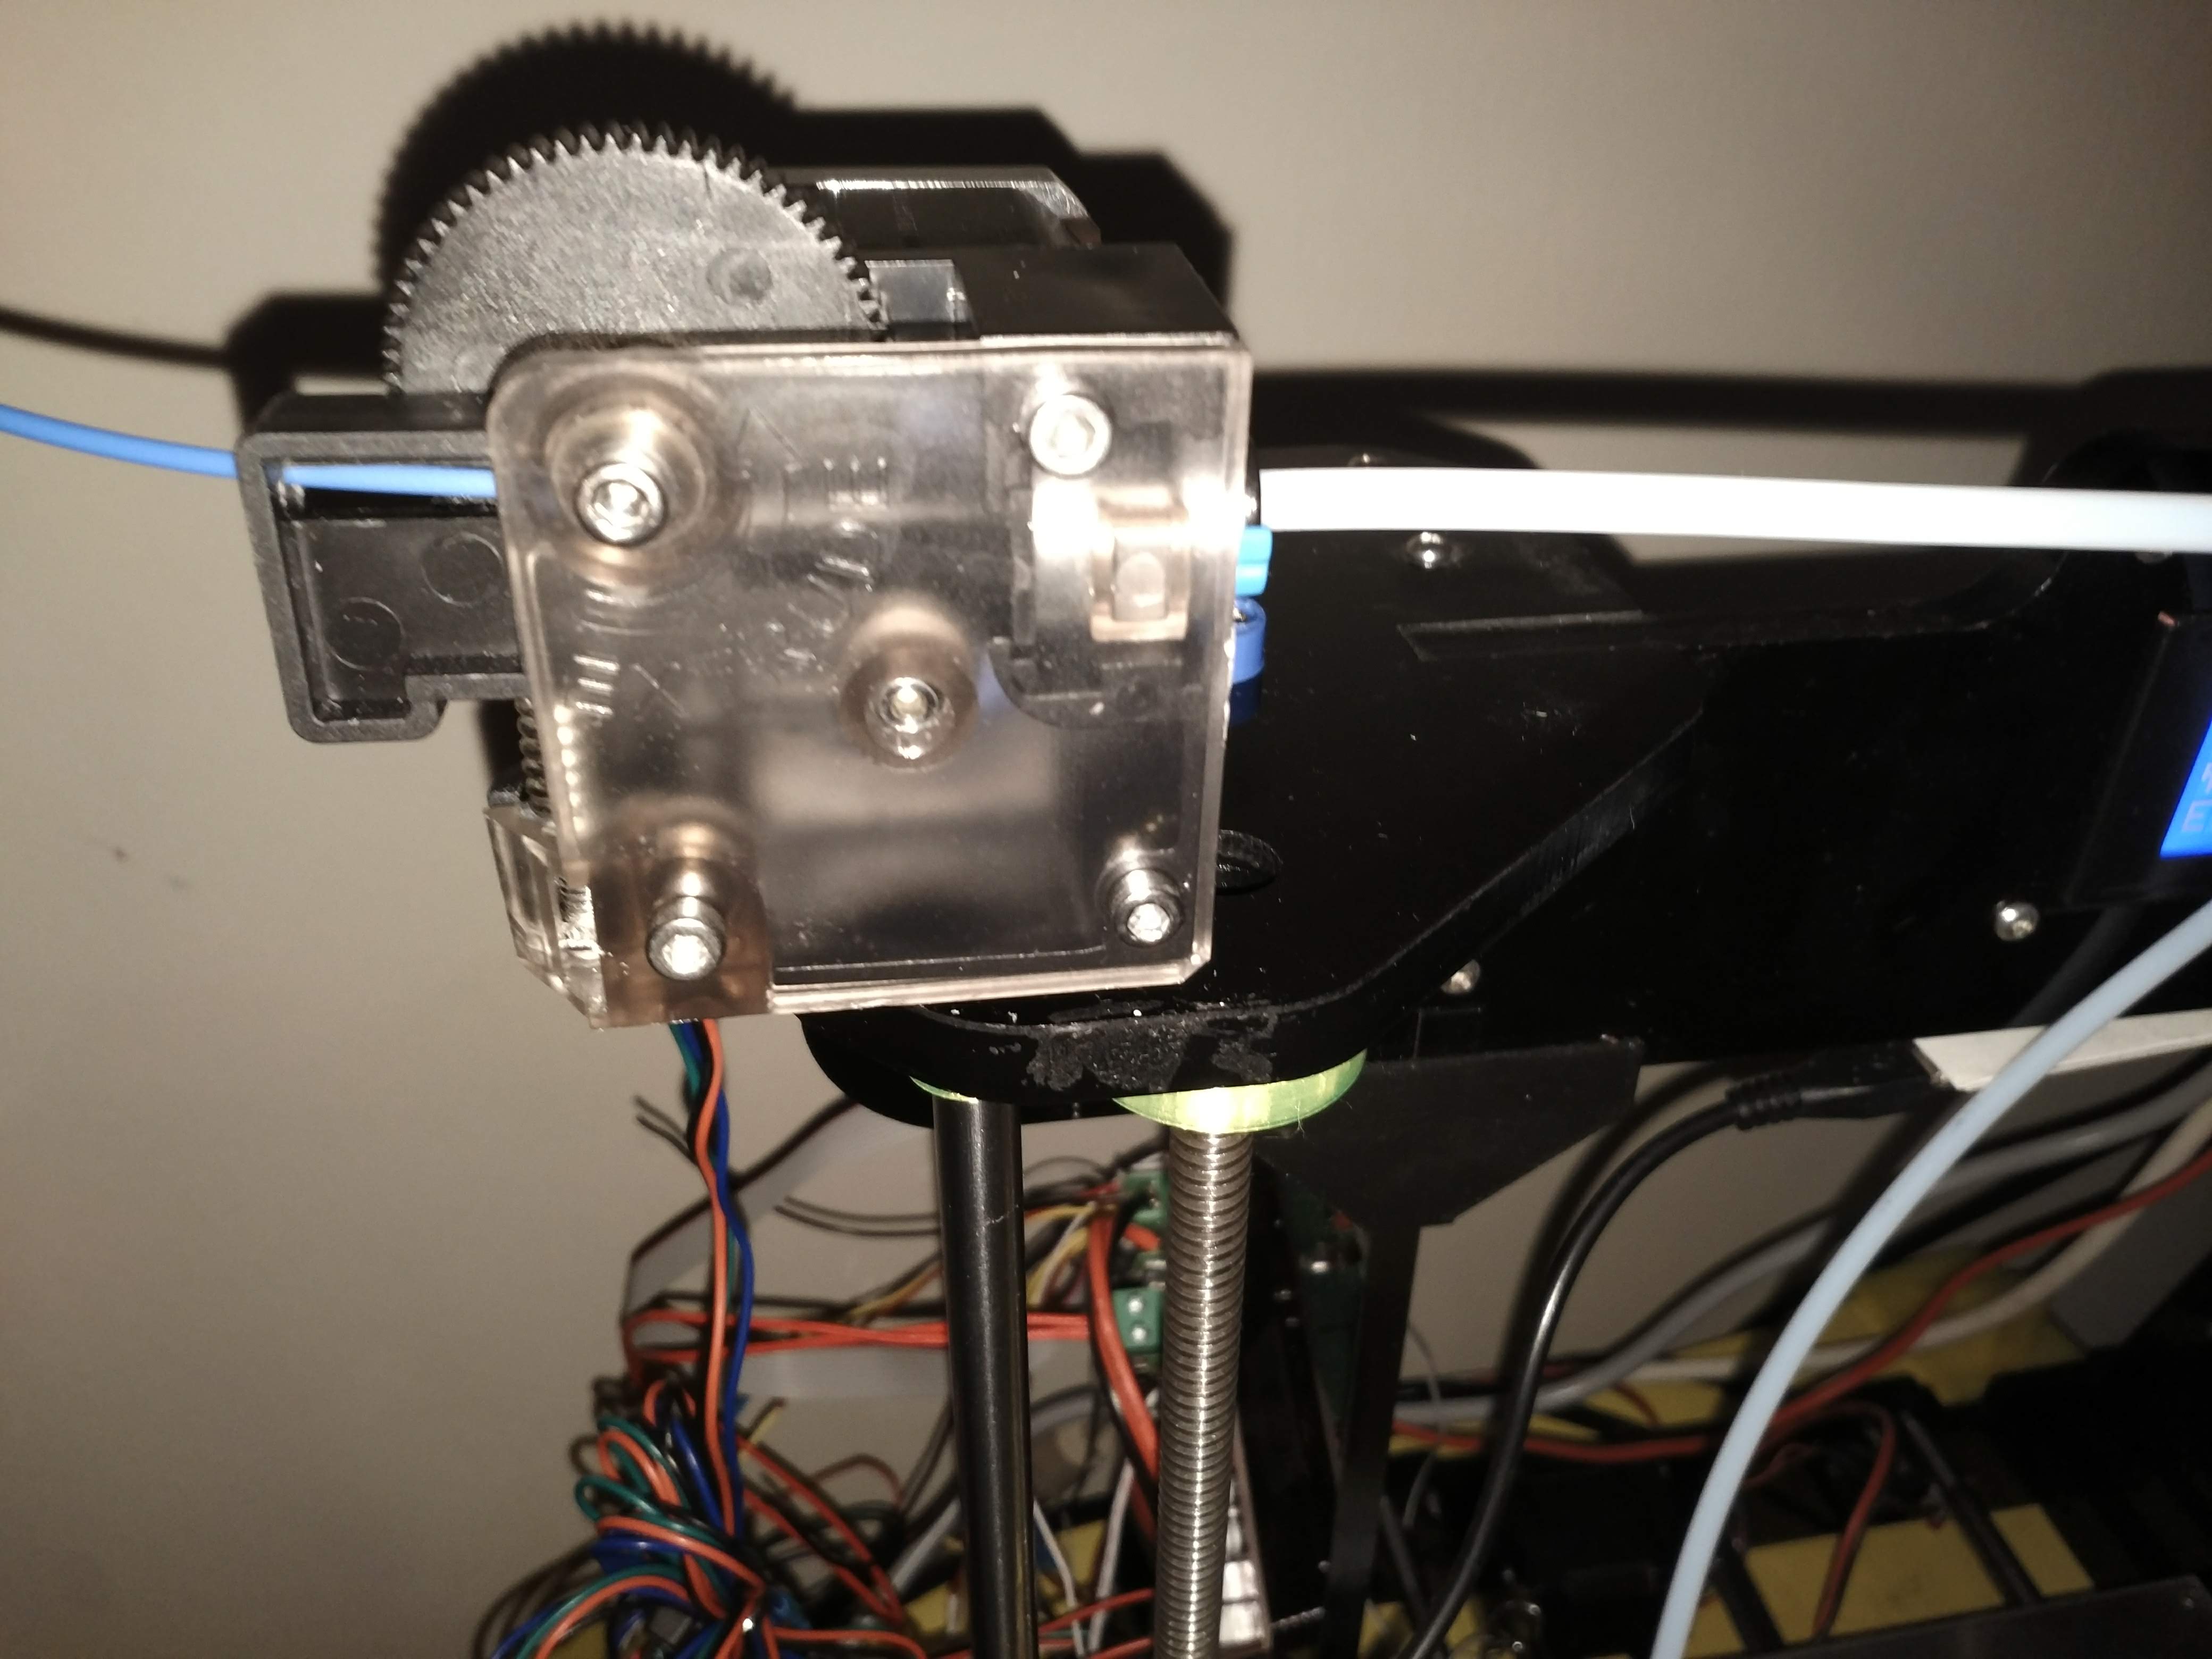
Why would you do it?

Nature is a whore – Kurt Cobain

Heavy carriage and not so stable frame, I never liked this setup. The Titan extruder doesn’t mount in direct configuration with the standard Hesine M-505 / Anet A8 hot end. I plan on installing the E3D hotend too but I like to do modular and independent hacks because of Kurt’s teaching (And Murphy’s laws).

Which is better between bowden and direct is an open political discussion on the internet. Choose as you please. My opinion is both party are wrong and filament should be free to organize and govern itself. Since Amazon does not sell anarchy-compliant filament I went for the modular solution.

What do you need

 

  • Titan Extruder (I bought a clone because the original one seem wasted on a cheap chinese printer) [Bangood]
  • PTFE tube and pneumatic connector (I got mine with the E3D v6 hotend clone I’ll use in next steps) [Bangood]

How do you do it

  1. Print the bowden mount for the titan extruder from here (https://www.thingiverse.com/thing:2959465)
    1. If you have the Anet A8 print the original version (https://www.thingiverse.com/thing:2253855)
  2. Unscrew the fan and the stepper from the x carriage
  3. Screw the pneumatic bolt from the e3d v6 hotend in the filament hole 
  4. Follow the manufacturer instruction to build the Titan extruder (Remember to mount the part you printed before)
  5. Use the software you like to change in the EEPROM the extruder step/mm to 418.5 or follow the substeps to flash again Marlin
    1. Go into the Marlin source with a terminal
    2. cd Marlin/example_configuration
      git clone https://github.com/AxelTB/Hesine-M505-Marlin.git
      cd ..
      cp example_configuration/Hesine-M505-Marlin/TitanExtruderVersion/configuration.h .
      cp example_configuration/Hesine-M505-Marlin/TitanExtruderVersion/configuration_adv.h .

    3. Open Arduino and flash as usual
  6. Calibrate the extruder

Random Tips

  • The titan extruder might need more pressure on the filament gear than the original one. Check if filament slips and untighten the screw
  • After screwing the extruder unscrew the extruder gear screw for a quarter of a turn if extruder locks

That’s all for the titan extruder. Most of my problems of filament locking went away with this mod. I’ve never tried it with the original firmware (Because I don’t fancy my house busting into flames) and I did made a lot of little mods.

In the next post I’ll explain how to mount the e3d v6 hot-end on a Hesine m505/Anet A8. I should have posted a summary of all the little modifications but recently a mechanic friend of mine made me notice I screwed up bad the anti-z wobbel so it’s back to the drawing board…

Hesine M-505 Upgrade Part 1: Anet A8 Board and Marlin Firmware

Around 4 years ago I bought a 3d printer. It came as a box with pieces and a SD card with some sort of assembly guide and an executable called RepetierHost.

Happy Easter to me (and thanks to Kinder for the training) i managed to make it somewhat work. I used it for various project and learnt lot of things but time passed and stuff started breaking. Obviously the aliexpress store where i did buy it closed so… no more spare parts. Lastly a couple months ago the hot bed connector just burned up.

After a lot of research I discovered the name of the printer should be Hesine M505.


It replies to M115 with:

FIRMWARE_NAME:Repetier_V1.4 http://zonestar3d.en.alibaba.com/ PROTOCOL_VERSION:1.0 MACHINE_TYPE:Mendel EXTRUDER_COUNT:1 REPETIER_PROTOCOL:2

Still I didn’t found any zonestar printer like mine but tons similar by hesine so Hesine m505 it is.

So, after a friend invited me to publish somewhere my voyage so people can get information from it I decided to go back annoying the internet with my stuff. Since is a work in progress it’ll probably have more than one episodes.

NB: By following this guide you can destroy your machine, hurt yourself and burn up your house. I take no responsibility for any damage or loss resulting in following this guide.

Some safety procedure will be omitted in this reduced guide. If you have no experience please wait for the full one.

Enought talk, let’s fight!

Board Upgrade to Anet-A8

1483080203923057

The original board of the printer is not that bad if you’re not afraid of fire. The real problem is that is unique, no more spare parts around. Upgrading your board allows you to experiment freely and go back to a functioning printer anytime.

Why do you wanna do this

  • It’s extremely hard to find Hesine M505 Board
  • Anet A8 board has very friendly connectors, much better for experimentation
  • My original board had some lost of connection issues

What do you need

  • Anet A8 Board: You can buy it cheap from gearbest
  • Connectors JST XH 2.54mm
    • 5 x 4 pin for Stepper motors (bangood)
    • 2 x 2 pin for fans
    • 5 x 3 pin for endstop and thermistors
  • Heat-shrink tubing and soldering iron to complete the job
  • A pc with repetier host (Or any software you like able to Read and write EEPROM parameters)

img_20180503_194714

How do you do it

If you build and make this printer work you probably don’t need step-by-step instruction. Just one thing: always disconnect power before making connections.

If you changed any components connection might not be the same. You can always refer to the tons of Anet A8 guides on the web.

Pre-flight check

Since cabling is an awful lot of work start by just connecting the power line and a stepper. Plug into the pc and verify the stepper is moving the right way. I had one laying around, unluckily it was the only inverted one…

Connections

Power, heat bed, and hotend are pretty straight forward.

Fan needs to be connected to the fan1 slot.

You can connect the additional fan to the fan2 slot if you don’t want to keep it plugged directly to the power supply.

The endstops and thermistors 3-pin cables need to be connected so the middle one is left free. Polarity is not important.

LCD connector just plugs in place.

Steppers motor need to be connected in the same sequence they are on the printer (black-green-blue-red) or in the opposite way. In my four original steppers the black cable is to be connected in the pin nearest to the fan pins. The spare one is reversed so you’ll have to try…

EEPROM Parameters

Connect the board to a pc and change:

  • the z-motor step/mm to 1600

It seem to be the only difference between the two. I didn’t print a lot with this firmware since I directly switched to Marlin. I you really need to keep this some fine tuning (Like extruder step/mm) may be required.

Try to print

My experiment worked just like that. At the second try because the first had the wrong step/mm on the z axis. Just be aware: using the printer like this is a huge fire hazard.

The good thing is that it seem to know if any thermistor isn’t connected.

Move to Marlin firmware

Since i don’t trust cable connections and Octoprint kept reminding me the Anet A8 firmware is not fire-safe I just printed a couple of small objects before deciding to move to the Marlin firmware. I don’t know which problem may this configuration have on the long run because of this. I strongly advise you to keep following the guide.


Upgrade to Marlin firmware 1.1.x

marlin2blogo

Open-source firmware with tons of documents and internet material. That’s the dream!

Why do you need it

  • Because you don’t want to set your lab on fire (At least not easily)
  • Because you wanna continue to improve your 3d printer and maybe change parts

What do you need

  • Hesine M505 printer with Anet A8 Board (Original board is hard to replace so it’s better to save it for rainy days, besides I don’t know if this would work on it)
  • Pc with Arduino IDE

How do you do it

  1. Download and install in the arduino ide the Anet A8 board definitions https://github.com/SkyNet3D/anet-board
  2. Download and extract Marlin in the arduino sketch folder
  3. Download and copy the configuration files in Marlin-1.1.x/Marlin/ from my repo https://github.com/AxelTB/Hesine-M505-Marlin
  4. Open Marlin.ino
  5. Connect the board
  6. Select The Anet A8 Board and your USB port
  7. Compile and flash


I’ll post a more complete guide with photos once i finished testing it. For now feel free to use this hints as you like.

Neje Laser Engraver on Linux

I bought a Neje DK-8-KZ laser engraver (Gearbest). It’s not bad at all but does not have any Linux Software. Luckily the communication protocol is pretty basic so understanding it was pretty easy.

Neje Printer

The working principle is pretty easy: The machines accept a 512×512 bit matrix in form of a 1 bit depth BMP.

I made a linux bash script to send the matrix to the Neje DK-8-KZ laser engraver (Link to github in the bottom). The image sent must be 512×512 1 bit depth andò vertically flipped. The image mono.bmp  is an example and, any image should be of the same dimension.


Best way to use is with gimp. Create a 512×512 image, flip it vertically then save as BMP. Then open it and do Image -> Mode -> Indexed -> 1 bit depth.

In this way you can manually write the dot matrix.


A more automatic way is using the python script to control the New laser engraver. This script has limited automation and works with any image (Current version still stretch non square images).

Right now the workflow is like this:

“`python3 printer.py

* Convert image

* Check converted.bmp for the result (It will be vertically flipped)

* Load image to new laser engraver

* Set burning time (Or default will be used)

* Print

It has some python dependencies because I used a couple of fast prototyping libraries.

Why the hell did I make a python script?

Simple! The python script is theoretically able to use the New laser carve to print complex images by dividing it by luminosity and printing overlapped images.

hdr
Burned logo

Links:

Project Gthub: https://github.com/AxelTB/nejePrint

Improving Habit whit HabitRPG and Smartband SWR10

HabitRPG is a funny way to track your habits simulating a game. Let’s use the swr10 Smartband and Tasker to add some good habit point when the walking target is reached. Can be used to track bad habits too with little modifications.

What do you need:

  • Sony Smartband SWR10 & Android phone
  • Tasker & Notification Listener (Target notifications don’t seem to be readable from standard Tasker’s notification event)
  • HabitRPG Account (The android app works fine but it’s not essential)

The Software

Storing Some global variable will be extremely useful for using various scripts. A simple script will do the trick (New Task -> Add -> Script -> Javascriptlet). You need to change the x with your API codes you can find in the API section of your HabitRPG settings. Whatch out for stray spaces when copying API keys.

setGlobal(“HabitrpgUrl”,”https://habitrpg.com/api/v2/user/task”);
setGlobal(“HabitrpgUserid”,”xxxxx“);
setGlobal(“HabitrpgApIToken”,”xxxxx“);


To chose what to do you have to set a new variable:

Name: %http_post_url

Value: %HabitrpgUrl/LifeLogGoodHabit/up

Where “LifeLogGoodHabit” will be the name of the habit and “up” the direction (You need to change it with down for bad habits). Now add another JavaScriptlet:

function add_item()
{
var http = new XMLHttpRequest(); http.open(“POST”,http_post_url,false);
http.setRequestHeader(“Content-Type”, “application/json”);
http.setRequestHeader(“x-api-user”, global(“HabitrpgUserid”));
http.setRequestHeader(“x-api-key”, global(“HabitrpgApIToken”));
http.send();
return(http.responseText);
}
try { var result = add_item(); } catch(e) { var error = e.message; }

You may wanna check if the local variable %error is set because habit won’t be registered. Script edited from this one by LadyAlys.

Now you can create a EventListener Event for the application LifeLog and link a task to parse the notification content checking the variable %nltext for word like steps. You can use multiple if – else if to respond to different events (Or for the word bookmark if you are interested in using the double click on the band for something like finding your car) and perform different tasks.


Links

Original version – Using Taker for ToDo in HabitRPG: http://habitrpg.wikia.com/wiki/User_blog:LadyAlys/Android’s_Tasker_app_and_HabitRPG’s_API

HabitRPG API: http://habitrpg.wikia.com/wiki/The_HabitRPG_Application_Programming_Interface

Debian (Jessie) on Santech X85

Setting up Debian on old laptop is a piece of cake, new ones are always tricky. These are some things you may need to setup a Santech x85

nVidia Optimus

This works only from Jessie, even if packets are presents in the weezy-backport they don’t seem to work….

You need to add nonfree and contrib software to your repository in order to make this work.

I took what follows from the second half of this post (From the green text).

# dpkg –add-architecture i386
# apt-get update
# apt-get install bbswitch-dkms intel-microcode firmware-linux-nonfree bumblebee bumblebee-nvidia primus primus-libs primus-libs:i386 linux-headers-$(uname -r)

Then edit the file /etc/bumblebee/bumblebee.conf changing

KernelDriver=nvidia

with

KernelDriver=nvidia-current


Then you just need to add yourself (And all users that will use the pc) to the bumblebee group

# addgroup axxx bumblebee


If you run

$ glxheads

then

$ optirun glxheads

you should see the different parameters of the two VGA cards.

Networking

The Ethernet card will just need its firmware to work

# apt-get install firmware-realtek

The wireless card seem to work with standard firmware but installing its software is pretty easy so…

# apt-get install firmware-atheros

Awesome

Installing

As I write the jessie version of awesome do not add the menu entry in gdm3 (And it’s the older version 3.4). There is a very fast way to obtain and install the 3.5 version for debian.

Download the .deb package for your architecture from here  (Bottom of the page) then:

dpkg -i awesome_3.5.5-1_amd64.deb

apt-get -f install

All dependencies are available in jessie so the first command may give some error but the second one should fix everything and give you the choice on login.

Configuring

Awesome needs a config file in order to work fine, my favorite one isfrom Elv13, you can download it like this

$ cd

$ git clone https://github.com/Elv13/awesome-configs.git .config/awesome

Then just press Mod4+ctrl+R and your deskot will reallybecome awesome!

Java Fix

Awesome wm has some issue with java or… this is what the illuminati want us to believe. The truth is that Java hates awesome, so to avoid gray Java windows in Awesome i simply inserted at the end of my ~/.bashrc:

wmname LG3D


 Remove the old-school-but-noisy beep

To avoid the gorram beep when you tab or logout you need to disable pcspkr

# vim /etc/modprobe.d/blacklist-pcspkr.conf

And add the line

blacklist pcspkr

Then you remove the module or simply reboot.

Extra

Time sync

Fastest way to set time is simply installing the ntp daemon.

# apt-get install ntp


Oracle Java

Openjdk is cool but sometimes the nice ol’ Oracle’s one make stuff easier. You just need to install java-package and create your own Debian package from the ones you can download from the official page HERE (Choose the right architecture and the tar.gz file). I installed both jre & jdk (For android studio) but as a general rule if you don’t know what jdk is you can only install jre.

# apt-get install java-package

$ make-jpkg jre-8u20-linux-x64.tar.gz

$ make-jpkg jdk-8u20-linux-x64.tar.gz

# dpkg -i oracle-java8-jre_8u20_amd64.deb

# dpkg -i oracle-java8-jdk_8u20_amd64.deb


So long space cowboys…

Find your car with swr10 smartband

Saving your car position with just a double click on your Sony SWR10 SmartBand. Another handy fiction for smartband’s lazy users.

My car hasn’t Bluetooth no more so all automatic car parking app (Like my beloved Carr Matey) are now pretty useless. Google’s automatic parking is awesome, when it does work, but it’s still unreliable. Unlocking the phone and set the point is out of the question. What mental disorder had the man who invented touchsceen? How should this be handy?

Let’s use our SWR10 smartband to solve the problem!

What do you need?

Intercepting Smartband events

Tasker can intercept notifications if set as  accessibility software it will tell  you when you first use a notification Event.

  1. Add New Profiles
  2. Chose the event UI -> Notification
  3. Chose “Lifelog” as app and set in title *Life Bookmark* as shown in the images below

  wpid-screenshot_2014-08-17-00-16-00.png wpid-screenshot_2014-08-17-00-18-30.png


Now every time you double click your SWR10 Button this event will be triggered (Without influencing Lifelog activity in any way but creating some bookmark points).


Saving position

  1. Create new task (Linked with the event created)
  2. Add Misc -> Get current Location with Source: GPS, Timeout: 30 as follow
  3. Add File -> Write File and chose a filename, set Text: %LOC
  4. [Optional] Add Plugin -> SmartBand Notification to have some ACK

wpid-screenshot_2014-08-17-00-34-46.png


This task will try to get the most precise location for max 30 seconds then save it in the file.

Finding your car

  1. Create new task
  2. Add File -> Read Line with the same file you used before and with a %variable named as you want to.
  3. Add App -> Open Map Mode: Point; Lat,Long: %variable; Label: Car

wpid-screenshot_2014-08-17-00-34-46.png  wpid-screenshot_2014-08-17-00-46-56.png

Shutting Down XBMC with Tasker and Yatse

In this post I’ll show you how to turn off a PC running XBMC with Taker and Yatse on Android. You can use the SWR10 events (See my previous post) to simply shut down your media center with your  Smartband.

What do you need:

Assuming you’re in a LAN with your XBMC devices Yatse setup will be smooth.

Tasker side

In Tasker you just need to create a Task with just one action:

Misc->Send Intent

Action: org.leetzone.android.yatsewidget.ACTION_MEDIA_COMMAND
Extra: org.leetzone.android.yatsewidget.EXTRA_STRING_PARAMS:shutdown
Target: Service

wpid-screenshot_2014-08-11-00-28-19.pngwpid-screenshot_2014-08-11-00-28-36.png

It will work only on the selected XBMC on Yatse. You can use a lot of different commands, see the link for the Yatse API wiki.

Links:

Yatse API Wiki – http://yatse.leetzone.org/redmine/projects/androidwidget/wiki/Api#Yatse-API

How to Use SWR10 for Tasker Events – https://axengineering.wordpress.com/2014/07/18/simple-hack-sony-smartband-swr10/

Shutting Down Your Media Center with SmartBand SWR10

Falling asleep in front of the tv is one of the best modern comfort. Searching for the remote to shut it down was a real pain. Modern media-center kinda worsened. But now you have a sleep tracking device connected to android!

What do you need:
– Sony SmartBand SWR10
– Compatible Android Phone (with Tasker and the profiles on previous post)
– A linux PC (Or a Raspberry Pi)

Linux Side

To make it simple I’ll use Node.js, it’s easy to use and in this fast moving times who has the time of setting up an Apache server?

Installing Node.js

On any debian-based deistribution you can just launch:

# apt-get install nodejs

Simple Web-Server

This simple code has not that much security so exposing it over the internet may be a bad idea. In your private lan will work just fine. If you think your lan is safe enough (or you want to use all the possible command from tasker you can use the full version of Nestor Urquiza’s shell to node.js server. Just follow the tutorial and edit tasker’s attributes as you like.

I made a few modification to make it able to only exec the script lshutdown. It’s a script I always used for shutting down my media center. The modified server look like this:

#!/usr/local/bin/node
/*
** Shutdown server for tasker. Require the script $PATH/lshutdown.
**
** Based on shell-server.js from
**
** @Author: Nestor Urquiza
** @Date: 09/29/2011
**
*/

/*
* Dependencies
*/
var http = require(‘http’),
url = require(‘url’),
exec = require(‘child_process’).exec;

/*
* Server Config
*/
var host = “192.168.1.77”,
port = “1337”,
thisServerUrl = “http://” + host + “:” + port;

/*
* Main
*/
http.createServer(function (req, res) {
req.addListener(‘end’, function () {

});
var parsedUrl = url.parse(req.url, true);
var cmd = parsedUrl.query[‘cmd’];
var async = parsedUrl.query[‘async’];

res.writeHead(200, {‘Content-Type’: ‘text/plain’});

if( cmd == “lshutdown”) {
console.log(“Requested shutowen”);
res.end(“ShuttingDown”);
var child = exec(“sudo “+cmd, function (error, stdout, stderr) {
var result = ‘{“stdout”:’ + stdout + ‘,”stderr”:”‘ + stderr + ‘”,”cmd”:”‘ + cmd + ‘”}’;
console.log(result + ‘\n’);
});
} else {
var result = ‘{“stdout”:”‘ + ” + ‘”,”stderr”:”‘ + ‘cmd is mandatory’ + ‘”,”cmd”:”‘ + cmd + ‘”}’;
res.end(result + ‘\n’);
}
if(async == “true”) {
var result = ‘{“stdout”:”async request’ + ” + ‘”,”stderr”:”‘ + ” + ‘”,”cmd”:”‘ + cmd + ‘”}’;
res.end(result + ‘\n’);
}

}).listen(port, host);
console.log(‘Server running at ‘ + thisServerUrl );

Remember to set the host and port variable according to your network configuration.

The lshutdown script must be in $PATH. Mine looks like this:


#!/bin/bash

#echo “ka 0 0” >/dev/ttyS0

apt-get update
apt-get -dy dist-upgrade
shutdown -h now

The commented line shuts down my tv the other lines are self-explanatory.

You may wanna add the lshutdown script in the sudoers file.

sudo ALL=NOPASSWD: /usr/bin/lshutdown

Then add the user launching the server.

Now you just need to launch the server:

nodejs script.js

Android Side

We will just use a simple HTTP GET request from Tasker that will be triggered when the night mode variable (%AxBand if you followed my previous post) is set.

Set Server:Port like your server before and Attributes to

cmd=lshutdown

My script checks for the reply too and vibrates accordingly but since the smartband cannot vibrate in night mode if your smartphone is far away is pretty useless…

Anything opening the web page http://server:port/?cmd=lshutdown will do the trick.

Now if you fall asleep watching tv you’ll only need to push the button of your SmartBand SWR10!

Links

http://axeltb.altervista.org/Axengineering/AxNight.prf.xml

Simple hack Sony SmartBand Swr10

The Sony Smartband SWR10 is a nice arm based gadget: 3 led, one button, Bluetooth and NFC but… Why the fuck should I use it to track my life? I have lot of unhealthy habits but a wristband without electroshock in it won’t help me change.

So… How can I use my awesome IP58 SWR10 Smart Band like I want to?
Being able to change the firmware or create a paralel app is too much for me alone (And I don’t have right now the equipment for Bluetooth sniffing) but, as always on Android, Tasker is the answer.

Notification and Tasker:
Tasker is able to catch notification if activated as accessibility program. The SWR10 SmartBand software generates different notification in day night and application mode so you can easily intercept every Event. By now I:
– Listen to the “Day Mode” or “Night mode” notification and set a variable accordingly (To be tested where I need)
– Listen to the “Application Mode” notify

How to use the profile:

Just check the global Variable %AxBand: It will be 0 if your SWR10 smartband is in Day Mode, 1 if is in Night Mode.
You may want to change the recognition pattern since the language reflects the one in your phone.

ACK and NACK

You may wanna have a response from Tasker in your smartband. The simplest way is to use smartbandnotifications by  markchalloner (Link below to github, in the folder src you’ll find the apk). Obviously you can just set the smartband to deliver all Taskers notification but it’s cleaner this way!

What can I do now?

Shutting Down your Linux Pc (Or exec any shell command)
Shutting Down XBMC (WIth Yatse)

Links:

MyProfiles

http://axeltb.altervista.org/Axengineering/SartbandDay.prf.xml
http://axeltb.altervista.org/Axengineering/SmartApp.prf.xml
http://axeltb.altervista.org/Axengineering/SmartBandNight.prf.xml

SmartBandNotifications

https://github.com/markchalloner/smartbandnotifications

Using Internal Temperature sensor on Energia Stellarpad

Since my pull request has just been merged I suggest you to use the GitHub version of Energia. If you are not already you may wanna start downloading it while you read. (Links at bottom as usual)

If you want to read the *Internal* temperature on a Texas Instruments’ Stellaris LM4F120H5QR now you just need to do:

analogRead(TEMPSENSOR)

Like any other Energia Board.

In the spare time i replicated the firmware flashed on my Stellaris Launchpad when i bought it.

Enjoy:

/*
Stellaris Demo
Similar to the one originally flashed on TI’s Stellaris.
This sketch use internal temperature sensor to command the RGB led.
PushButton 1 is used to save the temperature.

No Hardware Required*/

#define HALFRANGE 5.0f //Maximum difference between saved and present temperature

float temp0=304; //Initial Zero temperature

void setup()
{
//Set all leds as output
pinMode( RED_LED, OUTPUT );
pinMode( BLUE_LED, OUTPUT );
pinMode( GREEN_LED, OUTPUT );

//Set PUSBUTTON1 as input and attach interrupt
pinMode(PUSH1,INPUT_PULLUP);
attachInterrupt(PUSH1,resetTemp0,FALLING);

//Init serial
Serial.begin(9600);

}

float temperature,dt;

void loop()
{
//Evaluates temperature in K (The International System of Units rocks!)
temperature=(float) ( 4206.5 – 2475*analogRead(TEMPSENSOR)/4096 ) /10; //Convert as shown in the Stellaris Workshop Book

//Evaluate difference between present and saved temp
dt=temperature-temp0;

if(fabs(dt)<0.5) //If temperature near saved one
digitalWrite(GREEN_LED,HIGH); //Turn Green Led On
else
digitalWrite(GREEN_LED,LOW);

if(dt>0) //If temperature above saved
{
analogWrite(BLUE_LED,0);
analogWrite(RED_LED,dt*255/HALFRANGE); //Signal with red led
}
else
{
analogWrite(RED_LED,0);
analogWrite(BLUE_LED,-dt*255/HALFRANGE); //Signal with blue led
}

//Write temperature on serial
Serial.print(temperature);
Serial.println(” K”);

//Wait 300ms
delay(300);
}

//This function is called when the pushbutton1 is pressed
void resetTemp0()
{
//Save Last read as Zero Temperature
temp0=temperature;
}


C U.

Ax